引言
在上一篇文章中,分享了 Requests 自动加解密的方法,本篇文章分享一下更加方便的调试某个服务端接口。
Postman
Postman 这个工具后端小伙伴应该相当熟悉了,一般情况下我们会在开发和逆向过程中使用它来快速向接口发送请求,通过接口返回值来判断传入的接口参数是否正确。
在开发或者逆向过程中,有的时候接口的参数和返回值是加密的,有的时候还要先调用接口申请一个临时的 token 才能正常发送后续请求,这个时候我们要么就是用 Python 写一小段代码来验证接口逻辑是否正确,要么就是手动加密后再使用 Postman 发送请求,效率比较低,体验不太好。
这个时候,Postman 的自动加解密功能就派上用场了,我们可以使用 Postman 的脚本功能来自动实现这一功能。Postman 的脚本功能在很久之前就提供了,但是大家用的还比较少,我这里分享两个例子供大家参考,大家在用到的时候可以根据我的例子进行修改以实现自己的逻辑。
Pre-request
Pre-request 功能可以在 Postman 发送请求之前提前做一些事情,例如获取 token,计算签名,加密数据等等。
Post-request
Post-request 功能可以在 Postman发送请求收到响应后做一些事情,例如解密数据,验证签名等等。
测试服务端
为了方便验证 Postman 两个脚本的功能,我这里写了一个简单的服务端。只是 demo 代码,请大家不要吐槽哈
1
2
3
4
5
6
7
8
9
10
11
12
13
14
15
16
17
18
19
20
21
22
23
24
25
26
27
28
29
30
31
32
33
34
35
36
37
38
39
40
41
42
43
44
45
46
47
48
49
50
51
52
53
54
55
56
57
58
59
60
61
62
63
64
65
66
67
68
69
70
71
72
73
74
75
76
77
78
79
| import base64
import json
import time
import uuid
from hashlib import md5
from Crypto.Cipher import AES
from Crypto.Util.Padding import pad, unpad
from flask import Flask, request, Response
app = Flask(__name__)
token_cache = {}
def get_nonce():
return uuid.uuid4().__str__()
def encrypt(k, data, mode=AES.MODE_ECB):
aes = AES.new(k.encode(), mode)
result = aes.encrypt(pad(data.encode(), block_size=16))
return base64.b64encode(result).decode()
def decrypt(k, data, mode=AES.MODE_ECB):
aes = AES.new(k.encode(), mode)
result = aes.decrypt(base64.b64decode(data))
return unpad(result, block_size=16).decode()
def get_headers():
return {
'Content-Type': 'application/json',
'x-encrypt': 'true',
'nonce': get_nonce()
}
@app.get('/get_token')
def get_token():
token = str(uuid.uuid4())
token_cache[token] = int(time.time())
return {'token': token}
def check_token(token):
if token in token_cache and int(time.time()) - token_cache[token] <= 5:
return True
else:
return False
@app.post('/')
def index():
if not check_token(request.headers.get('x-token')):
return Response('token expired!', 401)
data = request.json
key = request.headers.get('x-key')
print(f"get timestamp is :{request.headers.get('x-timestamp')}")
print(f"get sign is :{request.headers.get('x-sign')}")
print(f"get key is :{key}")
print(f'encrypt json data is:{data}')
decrypt_data = decrypt(key, data['data'])
print(f'decrypt json data is:{decrypt_data}')
assert md5(request.headers.get('x-timestamp').encode()).hexdigest() == request.headers.get('x-sign')
headers = get_headers()
data = {'data': str(json.loads(decrypt_data)['data'] * 2) + (request.headers.get('x-sign') or '')}
print(f'before encrypt data is:{data}')
encrypt_key = headers.get('nonce').replace('-', '')[:16]
print(f'encrypt key is :{encrypt_key}')
d = encrypt(encrypt_key, json.dumps(data))
print(f'after encrypt data is:{d}')
return Response(json.dumps({'data': d}), headers=headers, mimetype='application/json')
if __name__ == '__main__':
app.run(debug=True, port=8888)
|
脚本具有以下功能:
- 每个请求都要带有一个
token,可以通过 get_token 接口获取 token 值,token 过期时间 5 秒 - 请求体是加密的,要先解密才能获取原始数据
- 每个请求都带有
sign 值,获取到请求后要先验证 sign 值是否正确 - 请求加密密钥在
x-key 请求头上,使用字符串去掉-后的前 16 位来解密数据,相反的,客户端使用同样的方式来加密 - 处理数据,这里为了演示,只是将收到的数据复制了一份并且加上请求的
x-sign 值然后返回给客户端 - 数据通过同样的方式进行加密,加密密钥在
nonce 响应头中
Pre-request 脚本
先看发送前的脚本:
1
2
3
4
5
6
7
8
9
10
11
12
13
14
15
16
17
18
19
20
21
22
23
24
25
26
27
28
29
30
31
32
33
34
35
36
37
38
39
40
41
42
43
44
45
46
47
48
| const CryptoJS = require('crypto-js');
const { v4: uuidv4 } = require('uuid');
let token='';
try {
const response = await pm.sendRequest({
url: "http://127.0.0.1:8888/get_token",
method: "GET"
});
console.log(response.json().token);
token=response.json().token;
} catch (err) {
console.error(err);
}
var timestamp = Math.floor(Date.now() / 1000);
const bodyObject = JSON.parse(pm.request.body.raw);
console.log(timestamp);
const uuid = uuidv4();
console.log(uuid);
const uuid_key=uuid.replace(/-/g,'').substring(0,16);
console.log(uuid_key);
pm.request.headers.add({
"key": "x-token",
"value": token
});
pm.request.headers.add({
"key": "x-timestamp",
"value": timestamp.toString()
});
pm.request.headers.add({
"key":"x-sign",
"value": CryptoJS.MD5(timestamp.toString()).toString()
})
pm.request.headers.add({
"key":"x-key",
"value": uuid_key
})
const key = CryptoJS.enc.Utf8.parse(uuid_key);
const encryptedData = CryptoJS.AES.encrypt(JSON.stringify(bodyObject), key, {
mode: CryptoJS.mode.ECB,
padding: CryptoJS.pad.Pkcs7
}).toString();
console.log(encryptedData);
const newBody = {
"data": encryptedData
};
pm.request.body.raw = JSON.stringify(newBody);
|
Pre 脚本具有以下逻辑:
- 先访问
get_token 接口获取临时的 token - 获取时间戳,解析请求的
body - 获取
uuid 按照正常的规则生成密钥 - 将
token,时间戳,sign,key 字段设置到请求头上 - 加密数据,然后替换原始的请求
body
Post-request 脚本
来看收到响应后的脚本:
1
2
3
4
5
6
7
8
9
10
11
12
13
14
15
16
17
18
19
20
21
22
23
24
25
26
27
28
29
30
| const CryptoJS = require('crypto-js');
pm.test("Status code is 200", function () {
pm.response.to.have.status(200);
});
const bodyObject = pm.response.json();
const encryptedData=bodyObject['data']
console.log(encryptedData)
const nonce=pm.response.headers.get('nonce');
console.log(nonce);
const key=nonce.replace(/-/g,'').substring(0,16)
console.log(key);
const decryptedData = CryptoJS.AES.decrypt(encryptedData,
CryptoJS.enc.Utf8.parse(key), {
mode: CryptoJS.mode.ECB,
padding: CryptoJS.pad.Pkcs7
}).toString(CryptoJS.enc.Utf8);
console.log(decryptedData);
var template = `
{{response}}
`;
pm.visualizer.set(template, {
response:decryptedData
});
|
Post 脚本具有以下逻辑:
- 先通过 Postman 自带的test 方法判断状态码是否是 200
- 获取加密后的
data 数据,获取请求头中的 nonce 字段,计算出密钥 - 使用计算出来的密钥解密上面获取到的加密数据,得到原始数据
- 使用 Postman 自带的
visualizer 方法来展示解密后的数据
以上两个脚本大家可以当做参考,这里只是作为一个示例。
请求演示
![image-20241126202233566]()
![image-20241126202811424]()
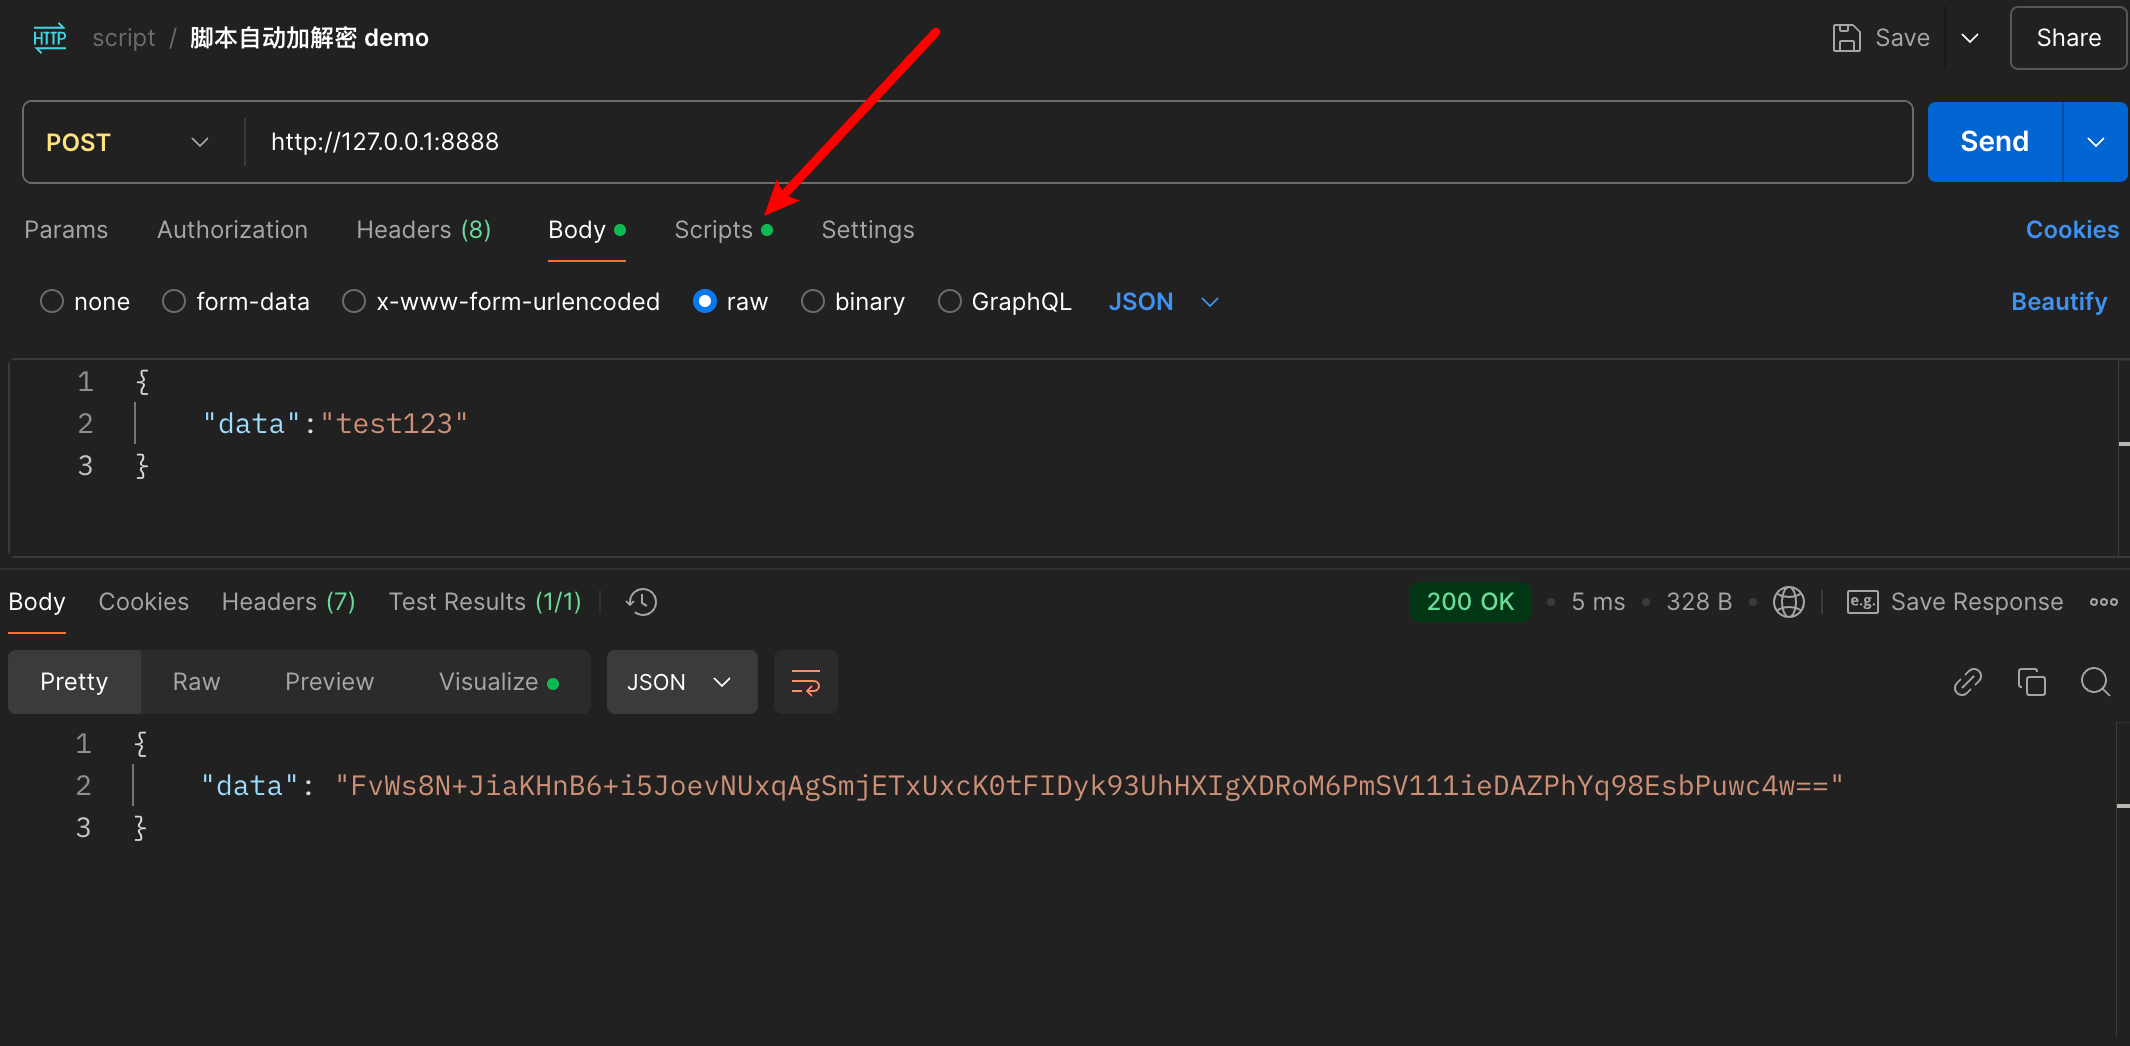
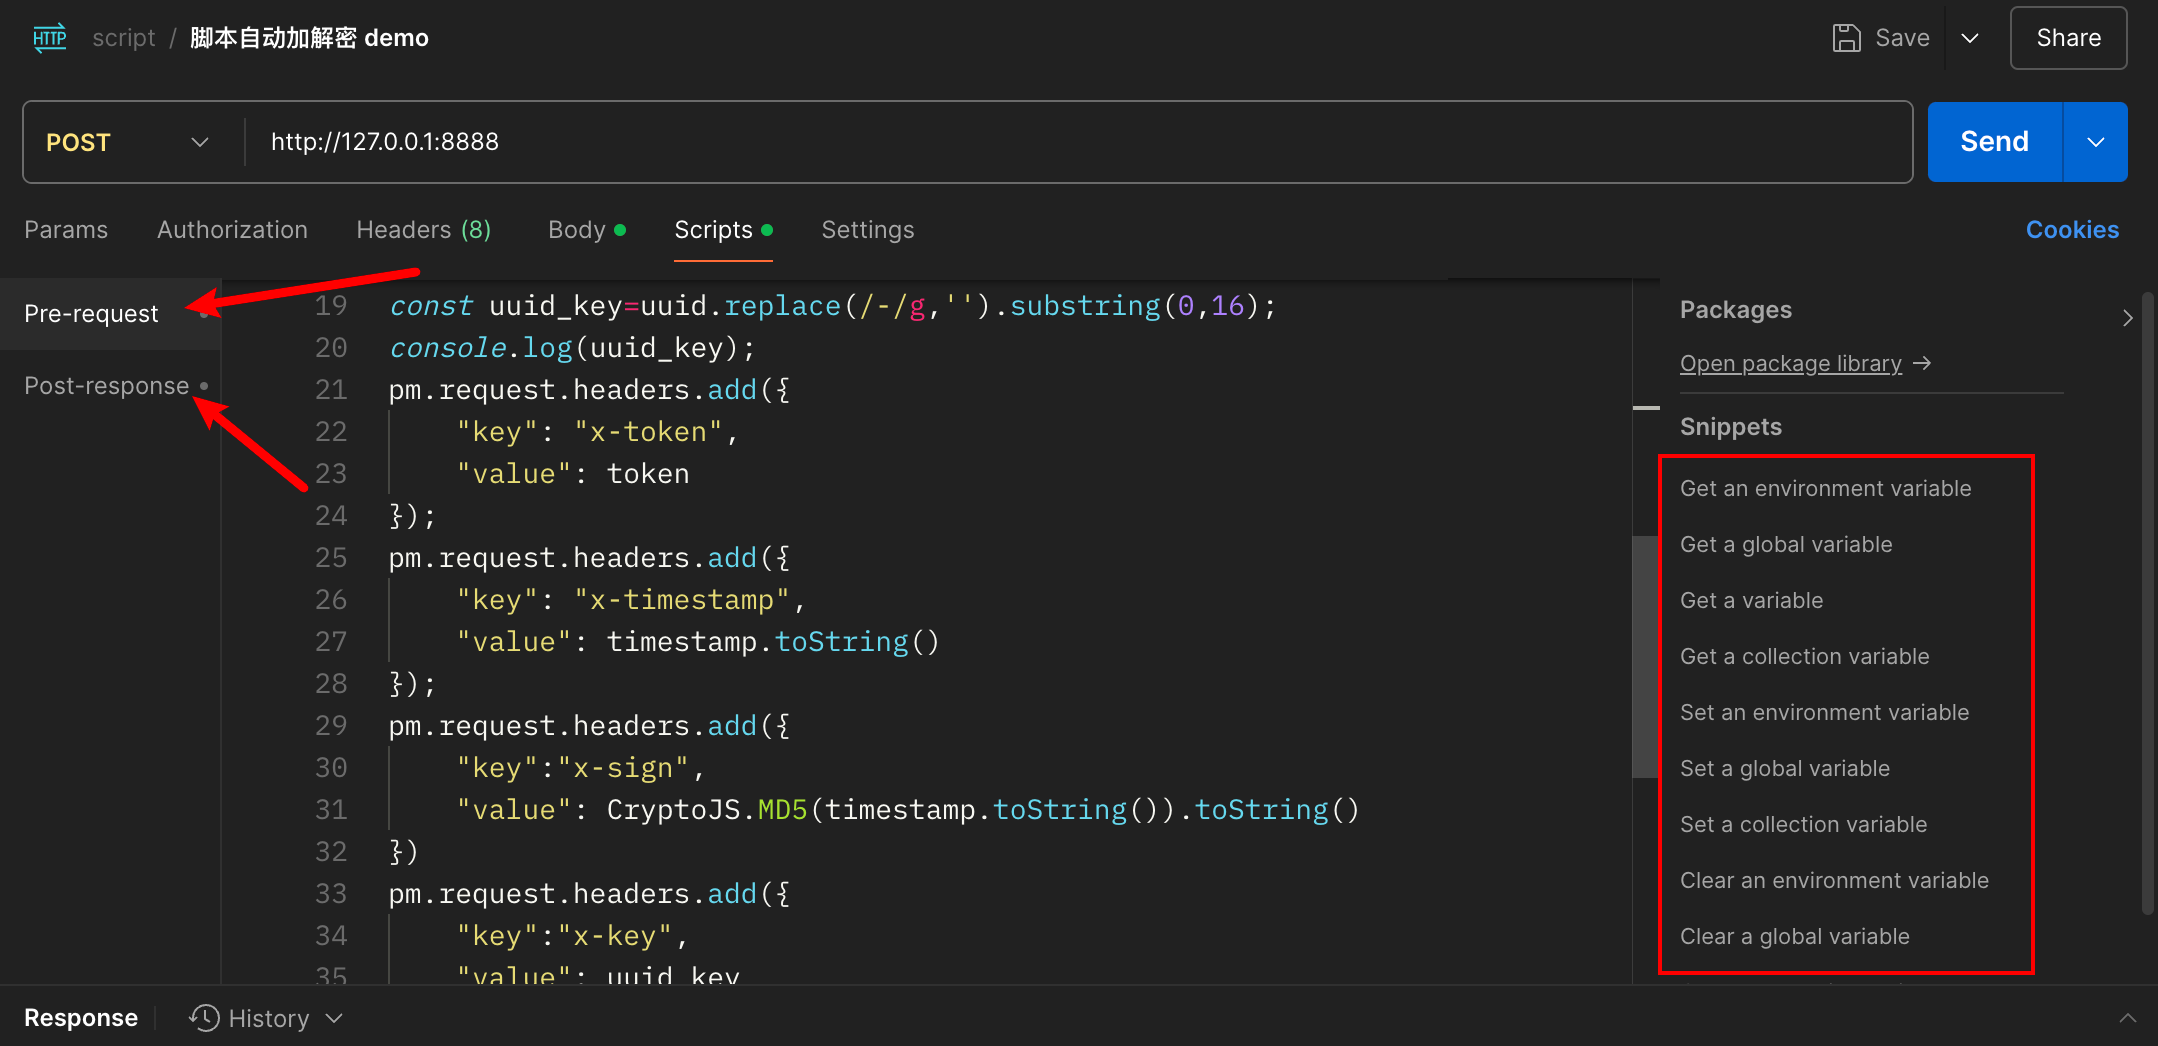
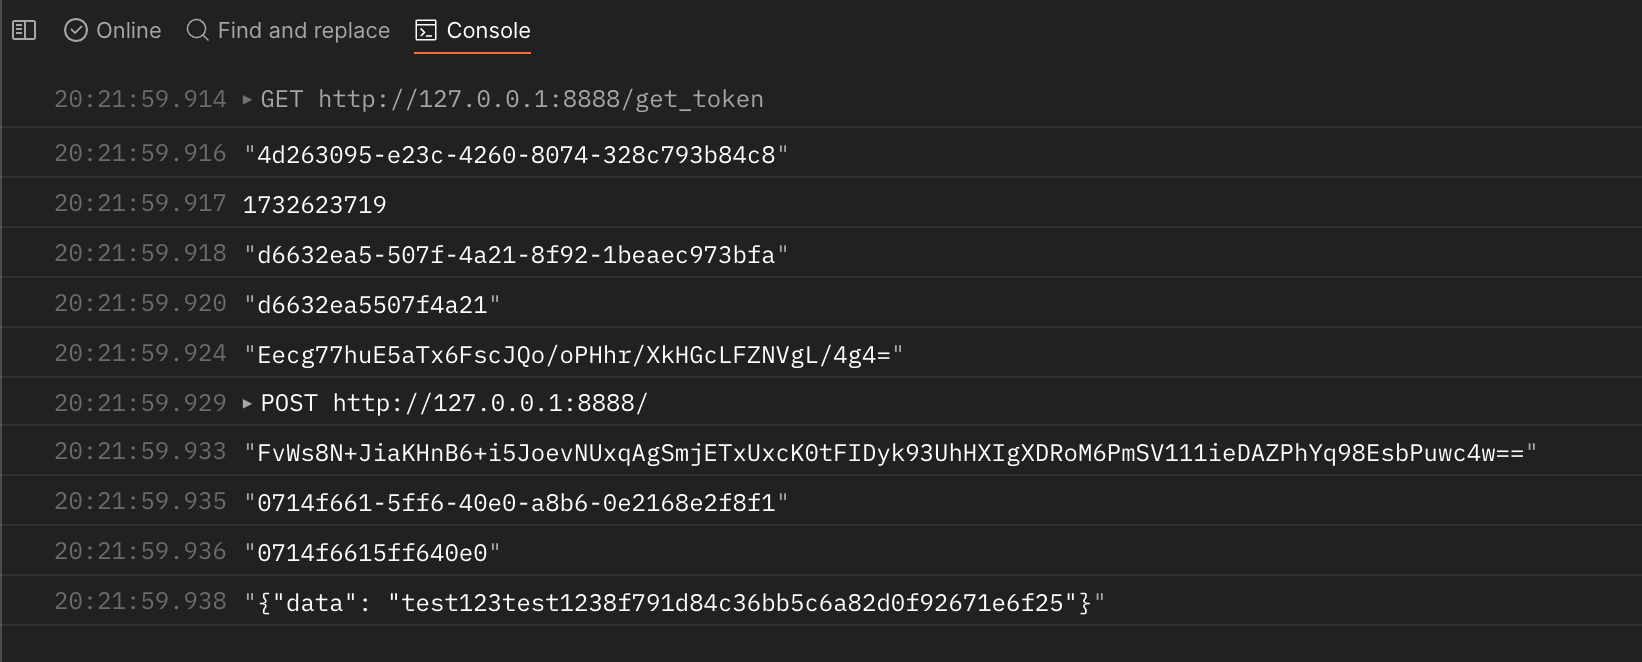
先看效果,请求的时候 body 是明文的,请求后获取到的响应是加密的,scripts 就是脚本的位置,右边还有一些代码片段可以供参考, 脚本的功能还有很多,例如获取环境变量,设置全局变量,发送请求等等,大家可以自行选择。可以在 Console 界面查看脚本的日志。
![image-20241126202932854]()
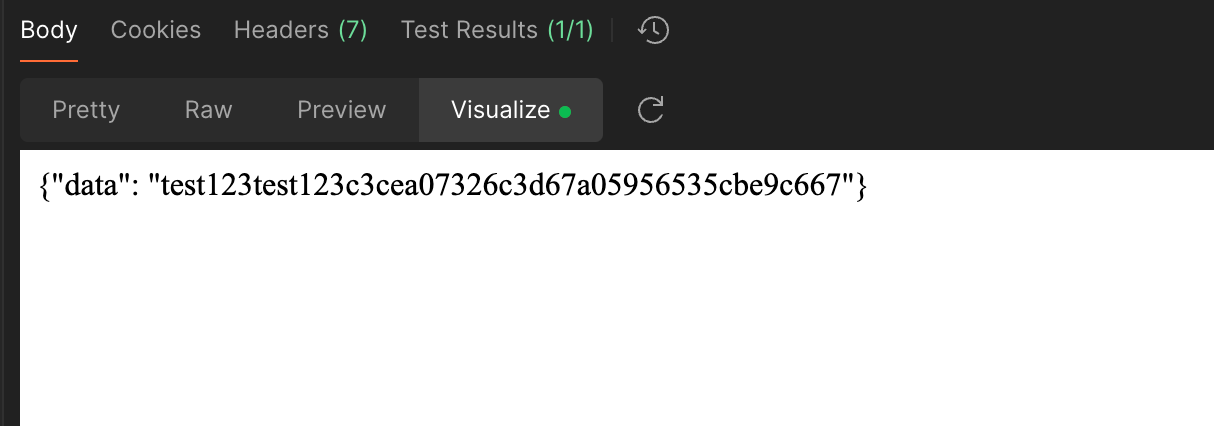
那在哪里查看解密后的数据呢,在 Visualize 中。平时大家基本上都是在 Pretty 中查看响应,响应可以被自动格式化,但是目前为止,我还没查到如何能修改 Postman 的响应,只能通过 Visualize 的方式将解密后的响应展示出来,如果有知道的小伙伴可以留言评论。
![image-20241126203100967]()
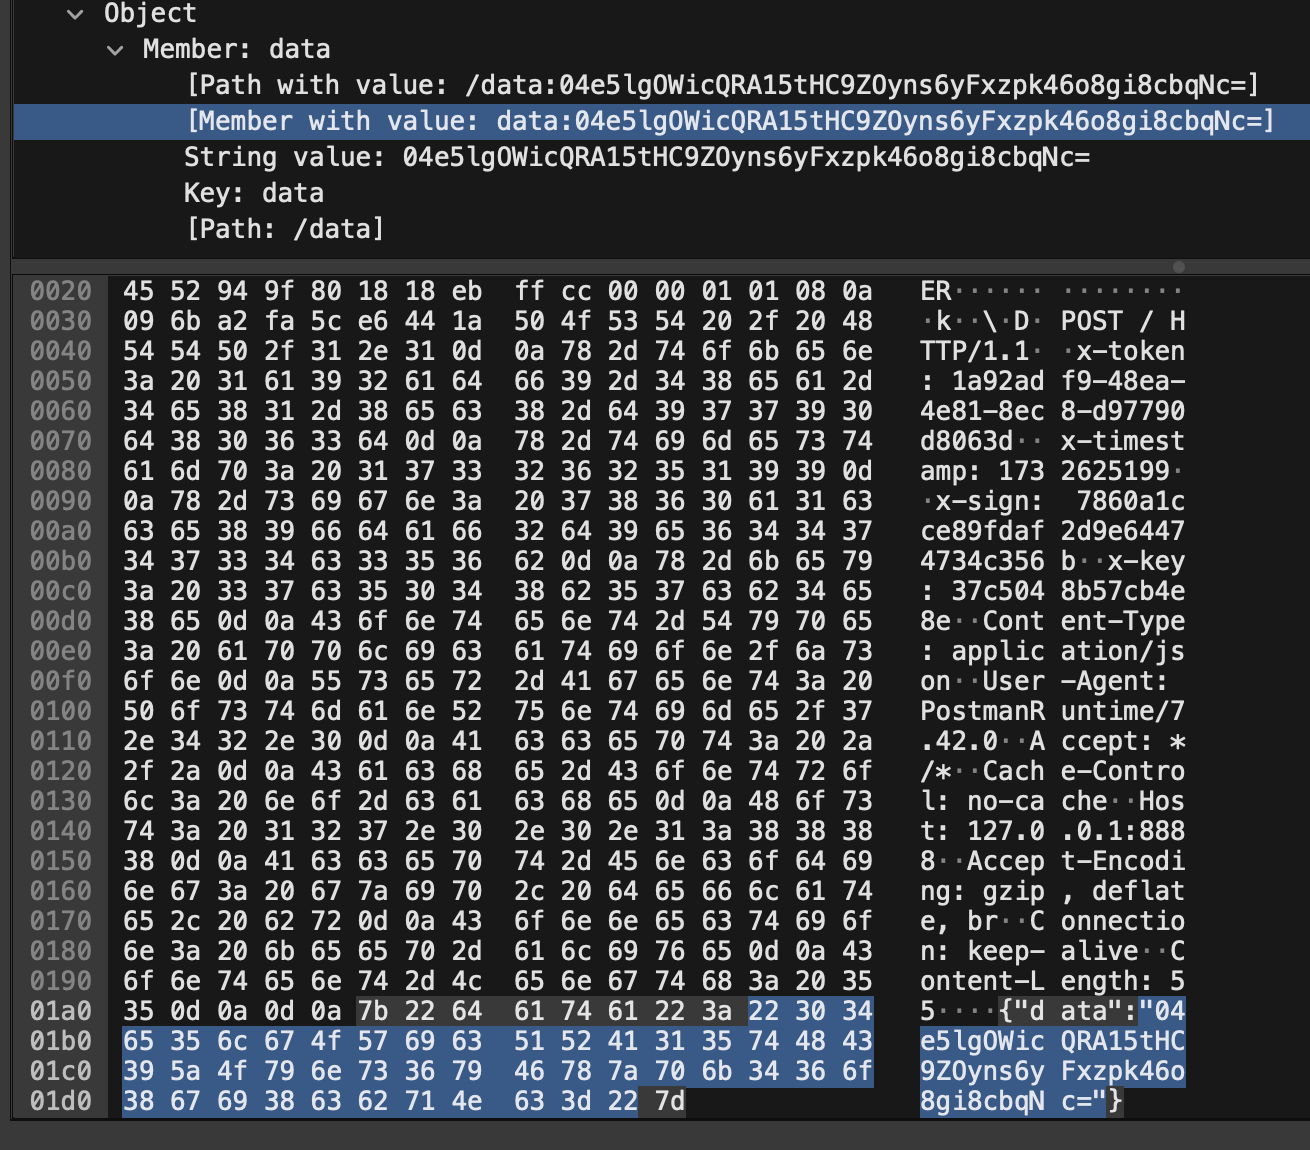
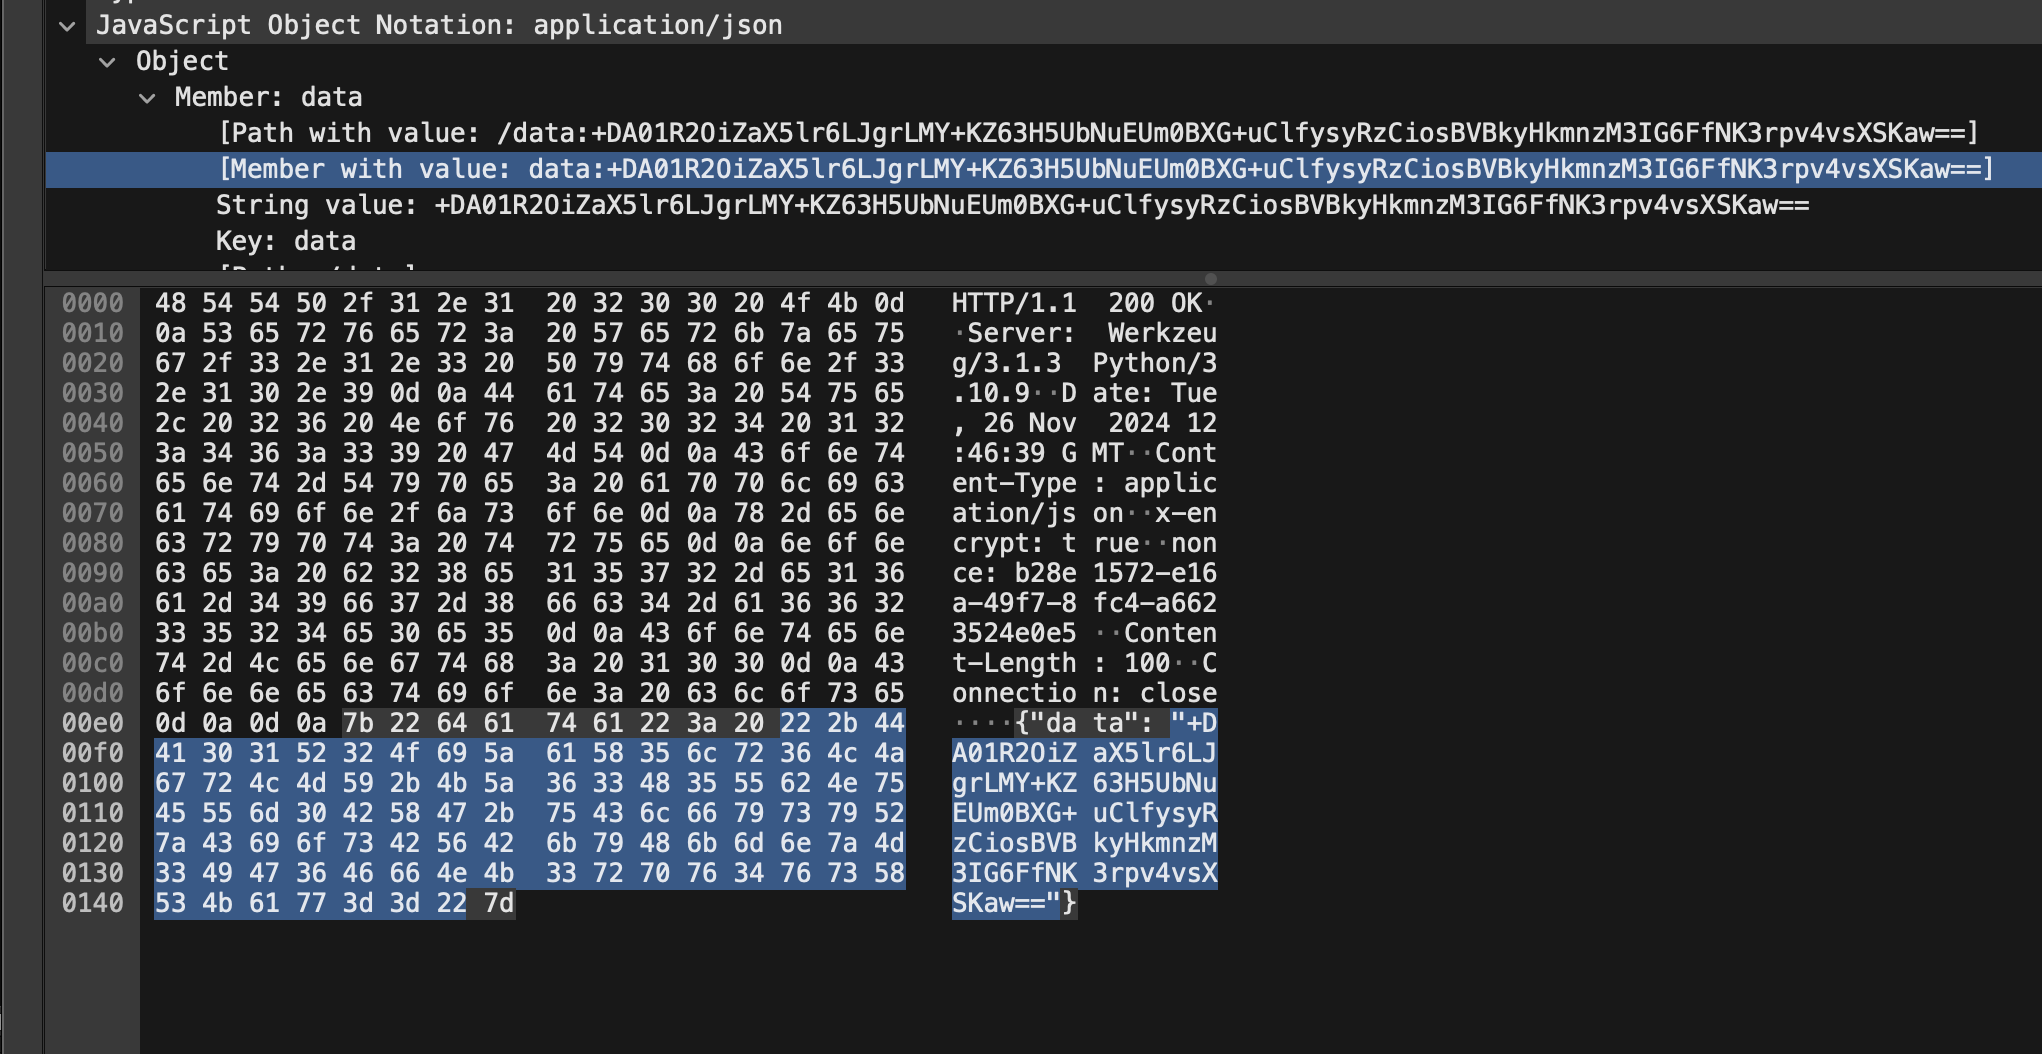
抓包验证
![image-20241126204720186]()
![image-20241126204740057]()
从抓包的结果来看,数据在请求和响应中都是加密的状态,但是在 Postman 中可以实时看到解密后的响应。
总结
以上就是通过 Postman 脚本来自动加解密的方法,有需要的小伙伴可以自行修改代码以提升接口调试的效率。
本文章首发于个人博客 LLLibra146’s blog
本文作者:LLLibra146
更多文章请关注公众号 (LLLibra146):![LLLibra146]()
版权声明:本博客所有文章除特别声明外,均采用 © BY-NC-ND 许可协议。非商用转载请注明出处!严禁商业转载!
本文链接:
https://blog.d77.xyz/archives/446a51c4.html